Spiky Lashes, Wispy lashes, Kim K Lashes, and Wet Look Lashes – we all love a captivating spiky finish! If you want to wow your clients and dominate Instagram with your signature Wet Look Lash sets, this guide is for you. We’ll walk you through the steps to create seriously textured Wet Lash Looks that will make heads turn!
First Things First…
Wet Look Lashes gained popularity in 2020 and immediately caught everyone’s attention. However, due to the pandemic, many lash techs couldn’t experiment with this style right away. But fear not, there has been a resurgence, and we’re thrilled about it!
A Wet Look Lash set breaks the rules by using volume lashes without fanning them out. Instead, you’re aiming for closed fans or spikes.
A Note on Spikes
Creating spikes is easier than you think. Take some Eyelash Primer on a microbrush and apply it along the tips of the lashes. This will keep the tips together, making it easier to pick up spikes. Be cautious not to get Primer on the bases of the lashes, as it can cause retention issues with your lash glue.
Additionally, when working with spikes, it’s best to use finer volume lashes compared to when creating fans. Spikes may weigh down natural lashes more than fans, so using a thinner lash thickness will help maintain balance.
Now that we’ve covered the basics, let’s dive into the process of creating Wet Look Lashes!
Mapping
You can create Wet Look Lashes in any shape you desire, whether it’s Dolly, Squirrel, Cat, Fox, or anything in between. Keep in mind that you’ll be working with layers, so consider different lengths for each layer. Start by determining what length is safe for your client’s lashes and go from there.
Before beginning, make sure you’ve completed your pre-treatment routine and applied eyepatches. Now, let’s move on to the fun part!
Layer 1
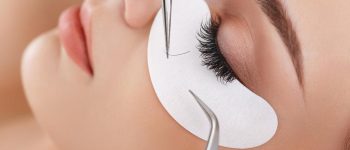
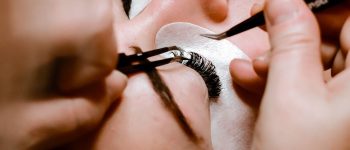
We’re about to share an easy way to work with layers. Start from the bottom layer by taking a piece of eyelid tape and using it to lift all the lashes back. Fix the tape to the upper eyelid, avoiding excessive pressure in the mid-section. This ensures that the lashes are not stuck down too hard, which can complicate the process later on. Use isolation tweezers to isolate the bottom layer of lashes.
Now that you have your first layer ready, you can begin the application. For a spiky, textured look, use closed lash fans on every single lash. If your client has sparse lashes, don’t worry, we’ll give you guidance on that in a moment!
With this layer, follow your shorter map lengths.
Layer 2
Once layer 1 is complete, we recommend applying Superbonder to the glue bonds. This ensures that the lash glue is completely dry and helps prevent stickies. Take more tape and gently stick down the lashes on the bottom layer, making sure not to crush them.
Now, use isolation tweezers to free the middle layer of lashes. Usually, people have 3 layers of eyelashes, but some may have more. If there are 4 layers, treat the middle layer as the middle 2 layers. This adds more density and makes the spikes on the top layer stand out even more.
On the middle layer, apply spikes that are 1 mm longer than the ones on the bottom layer if you want a highly textured, spiky look. For a slightly less spiky set, you can apply the same length to each layer, resulting in a more subtle finish.
Now, let’s address sparse lashes. If you need more coverage or want to add some fluff to the lash set, apply open fans through the middle layer. You don’t have to do it for every lash, as this would hide the spikes on the bottom layer. Just fill in the gaps every few lashes, and you’ll achieve amazing results!
Once you’re done, apply Superbonder to the bonds and tape it down. You can use the tape that’s holding the bottom layer to secure layers 1 and 2.
Layer 3
Now it’s time to remove the tape from the eyelid. Don’t worry; taping your client’s lashes back won’t be uncomfortable for them. They will barely even feel it!
On this layer, you can either apply lashes that are 1 mm longer than the middle layer or use the same lengths as usual, depending on the overall look you’re aiming for.
After completing the application, use Superbonder one last time. Remove the tape holding down the bottom two layers and gently brush through the lashes to bring everything together.
TOP TIP: When removing the tape from the bottom layer, be careful if your tweezers have rested on it while isolating lashes. Hold down the lashes with volume tweezers and use isolation tweezers to gently remove the tape bit by bit. This ensures that the extensions stay in place and provides a more comfortable experience for your client.
Other Things To Try
If a wet look alone isn’t spicy enough for you, consider adding colored spikes alongside the black ones. For a more intense result, apply the colored spikes to the bottom layer. For a subtle effect, apply them to the middle or top layers. If you want to turn heads, experiment with different colors across all layers!
With these tips and techniques, you’re well on your way to mastering the art of creating stunning Wet Look Lashes. Get ready to amaze your clients and take your lash game to the next level!
For more exciting beauty trends and inspiration, visit Ekilove.
Remember, practice makes perfect, so keep experimenting and honing your skills. Enjoy the journey and happy lashing!


